Skip to content

Today I learned

A collection of useful code snippets for a faster development.
Reading time < 5 mins

#9

Show console outputs based on environment

A project can be beautiful from the outside, but if the browser console is full of messy outputs it will immediately seem confusing and carelessly πŸ˜…

Using the local storange + custom script #

In this script we:

  • assign the window.console to a custom variable named consoleWrap
  • create a "state" variable devMode and save it in the browser local storage. We will use it to determinate if we are in development or production mode!
  • instead of use the default console.log() function, use the new consoleWrap.debug.log() instead, as it will be shown in browser console only when devMode local storage var is 'true'.
// main.js

let consoleWrap = {};

if (localStorage.devMode && localStorage.devMode === 'true') {
consoleWrap = window.console
} else {
consoleWrap = () => {}
}
// other-file.js

consoleWrap.log('Hello!')
consoleWrap.error('This is an error message!')

To set the devMode in browser local storage, please add this line in browser console:

// browser console

localStorage.devMode = 'true'

> Hello!

🧨 !important

local storage values are strings 🀭, so we have to assign the variable as string localStorage.devMode = 'true' and check its value as string localStorage.devMode === 'true'.

Using vue env + webpack + loglevel #

In a Vue project we already have webpack installed, and do not output noisy console.log() in production JS bundle is an efficient way to save kilobytes! 😏

Loglevel to the rescue!

Minimal lightweight simple logging for JavaScript. loglevel replaces console.log() and friends with level-based logging and filtering, with none of console's downsides.

Install it in development packages:

npm install loglevel --save-dev

In every JS file we would need to output something, we have to:

  • import loglevel
  • use its syntax, where log.debug == console.log
import log from 'loglevel';

log.debug('This output will be in both development and production mode')

Why did we talk about webpack above? πŸ˜…

Well, webpack will not add into the JS bundle the code that will never be executed, as for example a condition that will never match:

if ((2 + 2) === 5) {
// This code will never see the sunlight! 😒
}

so if we use node ENV variables settings:

# .env

VUE_APP_DEBUG=true
# .env.production

VUE_APP_DEBUG=false

we can add all console outputs we want to our project

import log from 'loglevel';

if (process.env.VUE_APP_DEBUG) {
log.debug('This output will be in development mode, but not in production mode')
}

and none of them will output in the final JS bundle! πŸŽ‰

#8

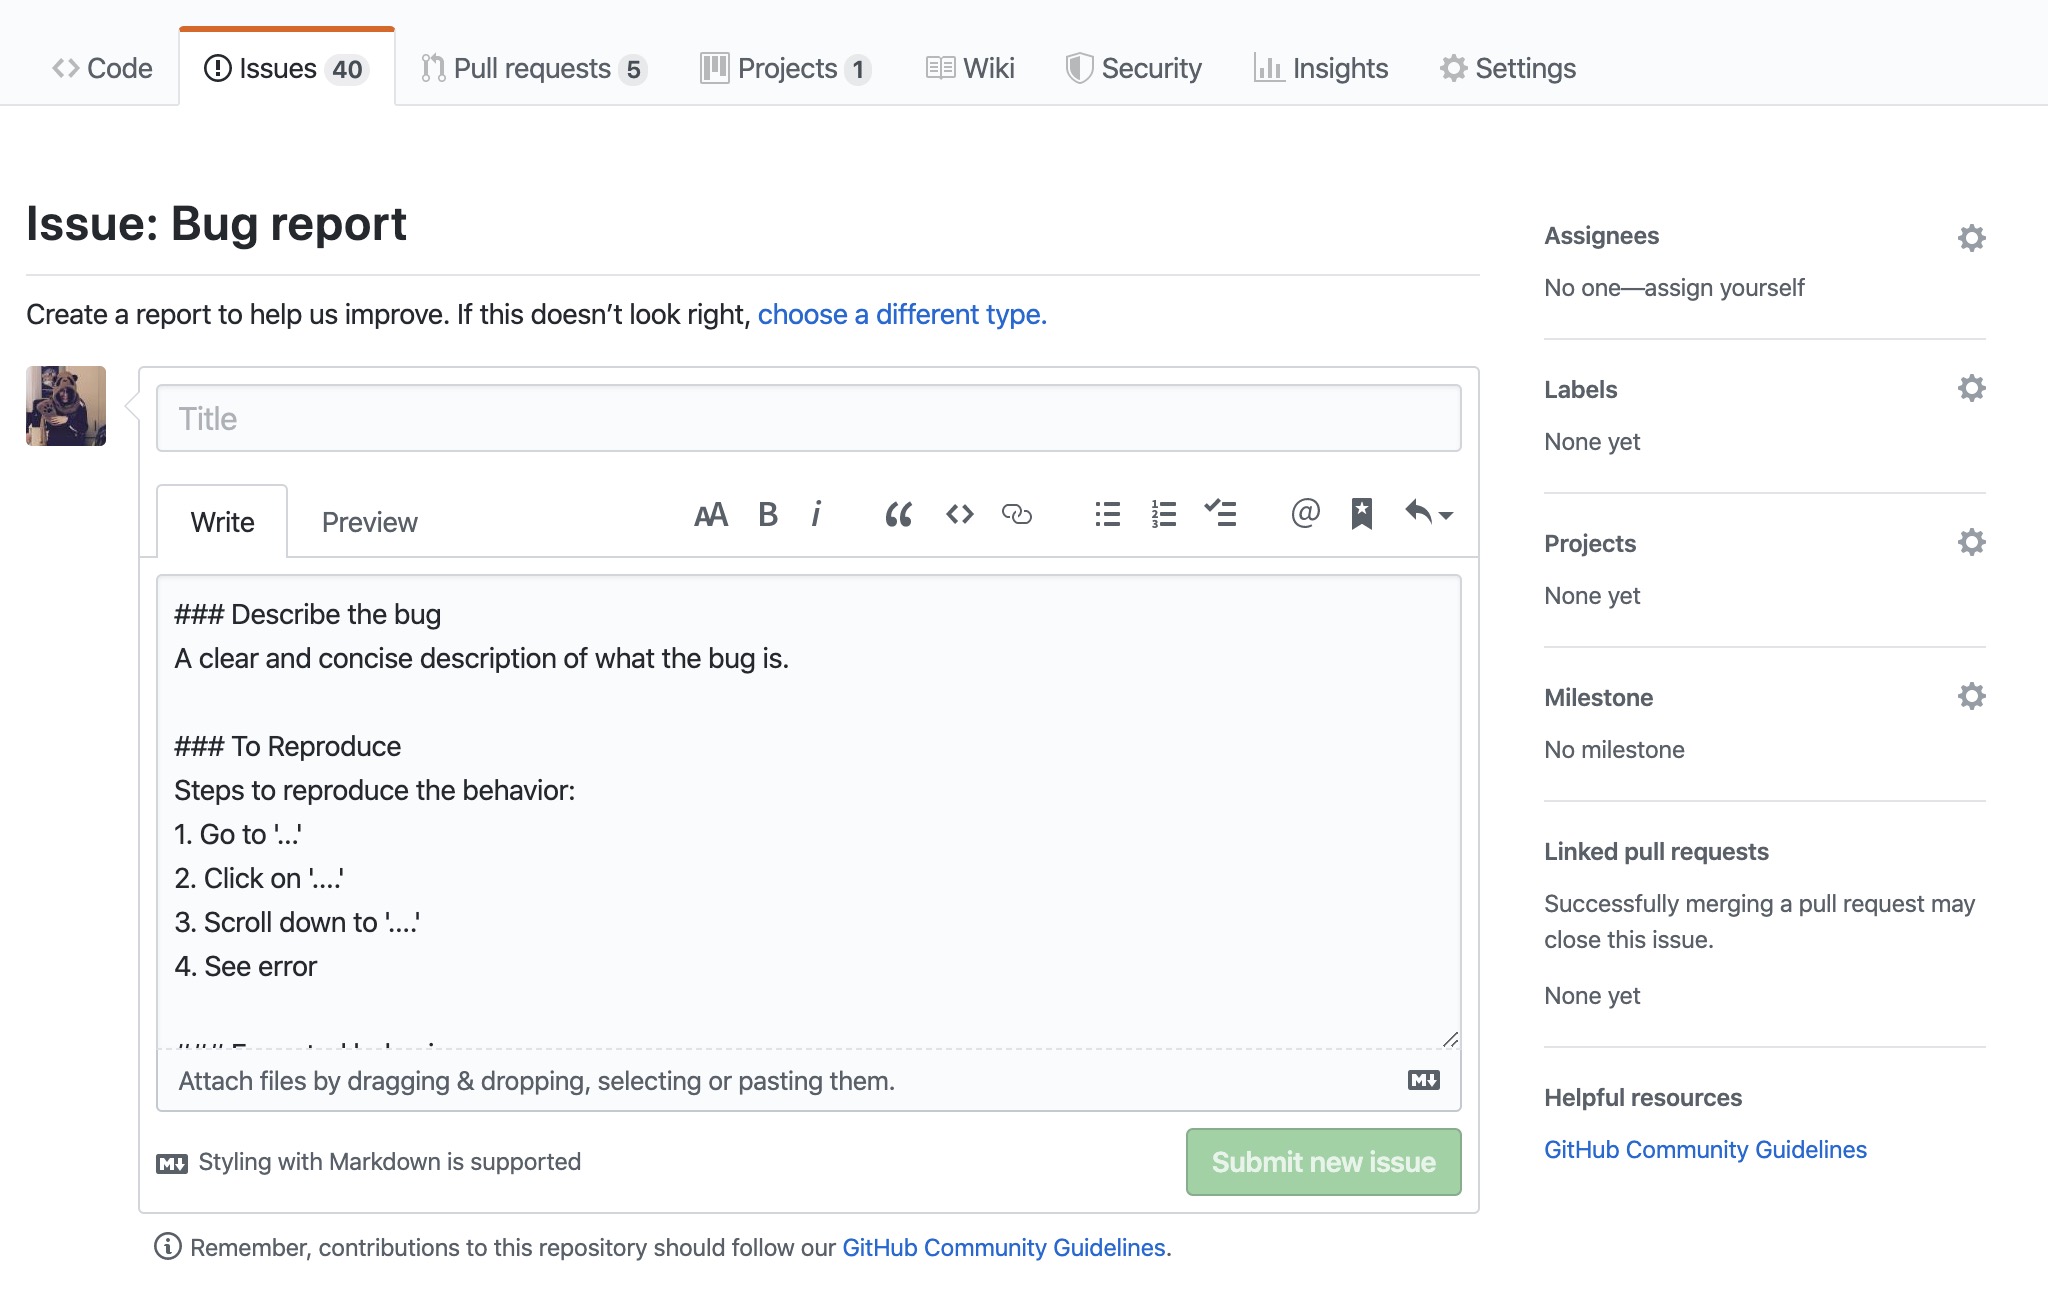
How to set up GitHub/GitLab issue and PR templates

Templates for both GitLab and GitHub #

Use the content that works best for you, here there are mine.

Template Snippet
issue πŸ™ GitHub snippet
pull request / merge request πŸ™ GitHub snippet
release πŸ™ GitHub snippet

Basic #

GitHub #

  • Create .github folder in project root.
  • Add templates files following this folder structure
β”œβ”€β”€ .gitlab/
β”‚ β”œβ”€β”€ ISSUE_TEMPLATE/
β”‚ β”‚ β”œβ”€β”€ issue-templates.md
β”‚ β”œβ”€β”€ PULL_REQUEST_TEMPLATE/
β”‚ β”‚ β”œβ”€β”€ merge-request-templates.md
β”‚ β”œβ”€β”€ RELEASE_TEMPLATE/
β”‚ β”‚ β”œβ”€β”€ release-templates.md
  • Commit and push on our default branch.

  • Check our project on GitHub. From now on, when we will open an issue, it will be pre-compiled with the markdown template we added.

issue template 01 issue template 02

GitLab #

In GitLab is pretty much the same, but here we have to create a folder named .gitlab, and add this folders structure:

β”œβ”€β”€ .gitlab/
β”‚ β”œβ”€β”€ issue_templates/
β”‚ β”‚ β”œβ”€β”€ issue-templates.md
β”‚ β”œβ”€β”€ merge_request_templates/
β”‚ β”‚ β”œβ”€β”€ merge-request-templates.md
β”‚ β”œβ”€β”€ release_templates/
β”‚ β”‚ β”œβ”€β”€ release-templates.md

Advanced #

If we need different templates to choose, we have to add folders instead of files, and add many files as we need.

β”œβ”€β”€ .github
β”‚ β”œβ”€β”€ ISSUE_TEMPLATE
β”‚ β”‚ β”œβ”€β”€ bug-report.md
β”‚ β”‚ β”œβ”€β”€ feature.md
β”‚ β”‚ β”œβ”€β”€ nice-to-have.md
β”‚ β”œβ”€β”€ PULL_REQUEST_TEMPLATE.md
β”‚ β”œβ”€β”€ RELEASE_TEMPLATE
β”‚ β”‚ β”œβ”€β”€ default.md
β”‚ β”‚ β”œβ”€β”€ hotfix.md

πŸ“š More info

git
#7

Sass placeholder and its limits

From the official πŸ“š Sass documentation

Sass has a special kind of selector known as a β€œplaceholder”. It looks and acts a lot like a class selector, but it starts with a % and it's not included in the CSS output. In fact, any complex selector (the ones between the commas) that even contains a placeholder selector isn't included in the CSS, nor is any style rule whose selectors all contain placeholders.

We can write a placeholder for reusable pieces of code prefixed by the % keyword:

// colors.scss

%colors-per-viewport {
background: red;

@media (min-width: 768px) {
background: blue;
}
}

and call the placeholder using the syntax @extend %[placeholder-name]

// component.scss

.colors {
@extend %colors-per-viewport;
}

CSS output:

.colors {
background: red;
}
@media (min-width: 768px) {
.colors {
background: blue;
}
}

As seen above, we could also declare a code snippet with mediaquery inside.

The small matter #

Unfortunately, we cannot call a placeholder declaration inside a mediaquery 😩

For instance, if we try to declare two placeholders and call them inside a media query

%colors-mobile {
background: yellow;
}

%colors-tablet {
background: green;
}
.colors-viewport {
@extend %colors-mobile; // ok!

@media (min-width: 768px) {
@extend %colors-tablet; // nope!
}
}

The code above will throw an error 😭

You may not @extend an outer selector from within @media.
You may only @extend selectors within the same directive.

So, if we really need to reuse a code snipped inside a mediaquery, we can use a mixin declaration.

I know, it is not the correct use of the mixin function... but it's a desperate measure! πŸ˜…

@mixin colors-mobile {
background: yellow;
}

@mixin colors-tablet {
background: green;
}
.colors-viewport {
@include colors-mobile; // ok!

@media (min-width: 768px) {
@include colors-tablet; // yasss!
}
}

πŸ“š More info

css
#6

Create CSS classes dynamically

SASS interpolation is an useful tool that comes in handy when we have to create CSS classes name dynamically from an array.

For the first version of this blog, I wanted different gradients based on post tag (git, vsc, nodejs...). Each tag is append to the main card class in order to create a modifier

// card.njk

<article class="c-card c-card--{{ tag }}"> ... </div>

and its CSS was this

// card.scss

$co_card-gradient-git: #eb3349, #f45c43;
$co_card-gradient-vsc: #1a2980, #26d0ce;
$co_card-gradient-nodejs: #36582f, #7ab659;

.c-card--git {
background: linear-gradient(to right, $co_card-gradient-git);
}

.c-card--vsc {
background: linear-gradient(to right, $co_card-gradient-vsc);
}

.c-card--nodejs {
background: linear-gradient(to right, $co_card-gradient-nodejs);
}

In attempt to remove repetitions and have a DRY (Don't Repeat Yourself) code, I tried to loop through a SASS list and generate classes

$tags: git, vsc, nodejs;

@each $tag in $tags {
.c-card--#{$tag} {
background: linear-gradient(to right, $co_card-gradient-#{tag});
}
}

but unfortunately SASS does not support variable name interpolation at the moment! πŸ’”

If you try to compile the snippet above, you will get

Sass Error: Undefined variable: "$co_card-gradient-"

Read more about sass interpolation

The workaround #

  • create a mixin using SASS conditionals with all cases you need
@mixin card-gradient($tag) {
@if $tag == 'git' {
background: linear-gradient($co_card-gradient-git);
}

@else if $tag == 'vsc' {
background: linear-gradient($co_card-gradient-vsc);
}

@else if $tag == 'nodejs' {
background: linear-gradient($co_card-gradient-nodejs);
}
}
  • use the tag list to dynamically generate classes names
$tags: git, vsc, nodejs;

@each $tag in $tags {
.c-card--#{$tag} {
@include card-gradient($tag);
}
}

πŸ–₯ Codepen example

Dynamic classes using CSS vars #

Note that if we use CSS vars instead of SASS vars we can interpolate the class name with #{} syntax.

  1. Declare the CSS var
:root {
--co_palette-1: #ef476f;
/* ... */
}
  1. Use the interpolation where it is called, for example in a @for loop
@for $i from 1 through 5 {
.t-palette-color--#{$i} {
background-color: var(--co_palette-#{$i});
}
}

If we need to mantain SASS vars (in my code, I needed to use darken and lighten SASS function) we could interpolate classes name like this:

$co_palette-1: #ef476f;
$co_palette-2: #ffc233;
$co_palette-3: #06d6a0;
$co_palette-4: #1b98e0;
$co_palette-5: #ff9f1c;

:root {
--co_palette-1: #{$co_palette-1};
--co_palette-2: #{$co_palette-2};
--co_palette-3: #{$co_palette-3};
--co_palette-4: #{$co_palette-4};
--co_palette-5: #{$co_palette-5};

--co_palette-1--lighten: #{lighten($co_palette-1, 10%)};
--co_palette-2--lighten: #{lighten($co_palette-2, 10%)};
--co_palette-3--lighten: #{lighten($co_palette-3, 10%)};
--co_palette-4--lighten: #{lighten($co_palette-4, 10%)};
--co_palette-5--lighten: #{lighten($co_palette-5, 10%)};
}
@for $i from 1 through 5 {
.t-palette-color--#{$i} .c-card::before {
background-color: var(--co_palette-#{$i});
color: var(--co_palette-#{$i}--lighten);
}
}

Output:

.t-palette-color--1 .c-card::before {
background-color: var(--co_palette-1);
color: var(--co_palette-1--lighten);
}

.t-palette-color--2 .c-card::before {
background-color: var(--co_palette-2);
color: var(--co_palette-2--lighten);
}

.t-palette-color--3 .c-card::before {
background-color: var(--co_palette-3);
color: var(--co_palette-3--lighten);
}

.t-palette-color--4 .c-card::before {
background-color: var(--co_palette-4);
color: var(--co_palette-4--lighten);
}

.t-palette-color--5 .c-card::before {
background-color: var(--co_palette-5);
color: var(--co_palette-5--lighten);
}
css
#5

Add comments in JSON file

Spoiler: I lied.

As you know, you cannot and will never can add comments in JSON file but you can add something that seems a comment 😈:

"_____________________________CSS_____________________________": "",

Using this key:value pair separator you can tidy a long and complex JSON, for example "scripts" object in package.json

{
"name": "super-styleguide",
"version": "1.0.0",
"description": "",
"main": "index.js",
"scripts": {
"_____________________________CSS_____________________________": "",
"stylelint": "stylelint 'src/scss/**/*.scss' || echo \"Stylelint failed for some file(s).\"",
"scss-to-css-dev": "node-sass --output-style expanded src/scss/styles/develop -o src/css/",
"css-to-postcss-dev": "postcss src/css --dir dist/css",
"styles-dev": "npm run stylelint && npm run scss-to-css-dev && npm run css-to-postcss-dev",
"_____________________________SVG_____________________________": "",
"clean-svgo": "rimraf src/icons/svgo/*",
"svg-optimize": "npm run clean-svgo && node scripts/svgo.js",
"_____________________________Webpack bundle__________________": "",
"bundle": "webpack --env.production",
"bundle:uiengine:chunk": " cross-env NODE_ENV=production webpack --env.production --config webpack.uiengine.config.js",
...
...
},

πŸ“š More info

JavaScript Object Notation (JSON) - MDN

#4

Oh my zsh git plugin cheatsheet

Some useful shortcuts I use with oh-my-zsh git plugin.

Alias Command Notes
gb git branch List of local branches
gba git branch -a List of local and remote branches
gcam git commit -am Add all files to stage and commit
gcmsg git commit -m Git commit message
gco git checkout Change branch
gco - git checkout to the previous branch Change branch to the previous one
gd git diff Files differences in staging
gfa git fetch --all --prune Fetch all remote branches, delete branch if upstream is gone
gl git pull Pull from remote
gp git push Push to remote
gpsup git push --set-upstream origin [currentbranch] Set upstream branch
gst git status Local files to commit

Add your zsh aliases #

  • Open zsh configuration file
nano ~/.zshrc
  • Add aliases using the syntax
alias [name]='[command]'

For instance, these are my aliases in .zshrc file

alias gflbs='git flow bugfix start'
alias gflbf='git flow bugfix finish'

alias gbm='git branch -m'
alias gbD='git branch -D'
alias gbuu='git branch --unset-upstream'

To apply these changes, you should close the tab and open a new one or you can run

source ~/.zshrc

or shorter version

. ~/.zshrc

My aliases #

Here are some shortcuts I added compared to the ones came with oh-my-zsh plugin

Alias Command Notes
gflbs git flow bugfix start Start a bugfix/ branch from develop
gflbf git flow bugfix finish Finish a bugfix/ branch from develop
gbm git branch -m Rename branch
gbD git branch -D Delete local branch with force option
gbuu git branch --unset-upstream Unset upstream branch

πŸ“š More info

#3

How to rename a git branch

Rename local branch #

To rename a local branch in git

  • Move on the branch you want to rename
git checkout -b feature/wrong-name
  • Rename it locally
git branch -m feature/new-awesome-name

⚑️ Bonus tip #

If you have ohmyzsh git plugin installed, you can use its shortcuts

gco -b feature/wrong-name
gbm feature/new-awesome-name

Rename remote branch #

To rename a remote branch is quite longer:

  • Unset the upstream branch to unlink local and remote branch
git branch --unset-upstream

Note: if you followed the previous step, you don't have to delete local branch because you have already renamed it!

  • Update the upstream branch to the new one and push it
git push --set-upstream origin feature/new-awesome-name

⚑️ Bonus tip #

If you have ohmyzsh git plugin installed, you can use its shortcut to set the upstream

gpsup (branch name is implicit)
  • Delete remote branch
git push origin --delete feature/wrong-name

or the shortest syntax (note the space between remote name and semicolon)

git push origin :feature/wrong-name
#2

Visual Studio Code shortcuts

Some useful shortcuts I use in Visual Studio Code:

Command Description
(find) \n([\w]) -> (replace with) $1 remove all blank lines and replace them with space (using RegEx)
cmd + b toggle sidebar
cmd + shitf + v preview markdown
opt + up/down move row up/down
opt + z toggle text wrap
ctrl + w switch workspace
cmd + f -> focus away -> cmd + g find occurence, focus away, go to the next occurence
search a word, then ↑ it will return the previous search keyword
vsc
#1

How to remove all links in JavaScript

If you need to remove all links occurrencies in a webpage and return it as plain text you can go with two methods:

Basic method #

If you know the content of all your hrefs you can use this basic way. In my example, the href content is a simple hash #.

  • get the page content as string

  • replace all start anchor tags using the JavaScript method String.prototype.replace() with the RegEx /g global pattern flag: it returns all matches (it does not return after first match)

.replace(/<a href="#">/g, '')
  • replace all end anchor tags using RegEx
.replace(/<\/a>/g, '')
  • concatenate the two replace functions
const mystring = `<a href="#">The cat</a> (Felis catus) is a domestic species of small carnivorous mammal. It is the only domesticated species in the family <a href="#">Felidae</a> and is often referred to as the domestic cat to distinguish it from the wild members of the family.`

mystring.replace(/<a href="#">/g, '').replace(/<\/a>/g, '')

Output

The cat (Felis catus) is a domestic species of small carnivorous mammal. It is the only domesticated species in the family Felidae and is often referred to as the domestic cat to distinguish it from the wild members of the family.

Live RegEx example

Advanced method #

In this way, we can remove all anchor tag instances from our string, even those we do not know the hrefs.
Thanks to @shadowtime2000 for pointing that out πŸ™‚

  • create a new DOM element
let elem = document.createElement('div')
  • add the inner HTML passed as string
elem.innerHTML = `<a href="https://en.wikipedia.org/wiki/Cat">The cat</a> (Felis catus) is a domestic species of small carnivorous mammal. It is the only domesticated species in the family <a href="#">Felidae</a> and is often referred to as the <strong>domestic cat</strong> to distinguish it from the wild members of the family.`
  • loop through all <div> children (so we are looping the HTML string we have just passed) and check if there are any <a> tag.

🧨 !important

tagName returns the tag name of the element, and in HTML language it is in uppercase.

Array.from(elem.children).forEach(child => {
// if child is an HTML tag different from an anchor <a>, then skip it
if (!(child.tagName === 'A')) return
// else if child is an anchor tag,
// then replace the current node with a new textNode containing the anchor text content
// <a href="#">wow!</a> -> wow!
child.replaceWith(document.createTextNode(child.textContent))
})

To sum up

let elem = document.createElement('div')

elem.innerHTML = `<a href="https://en.wikipedia.org/wiki/Cat">The cat</a> (Felis catus) is a domestic species of small carnivorous mammal. It is the only domesticated species in the family <a href="#">Felidae</a> and is often referred to as the <strong>domestic cat</strong> to distinguish it from the wild members of the family.`

Array.from(elem.children).forEach(child => {
if (!(child.tagName === 'A')) return
child.replaceWith(document.createTextNode(child.textContent));
})

Output: console.log(elem)

<div>The cat (Felis catus) is a domestic species of small carnivorous mammal. It is the only domesticated species in the family Felidae and is often referred to as the <strong>domestic cat</strong> to distinguish it from the wild members of the family.</div>

πŸ“š More info